Structuring a WPF User Interface
When creating a typical user interface, say a Window, Page or UserControl, we start with the top-level container and nest other containers or controls inside it. This is a good approach for a first attempt. But just like we refactor our code to make it more maintainable, we should also be refactoring the User Interface by applying similar principles. Such a refactoring leads to a more maintainable view. Also since we are only refactoring, the final view looks the same but the internal construction is different. In this blog post I’ll present some such refactorings in the context of the WPF User Interface. Note that the concepts I present here are already popular when developing with Adobe Flex.
The IM Client example
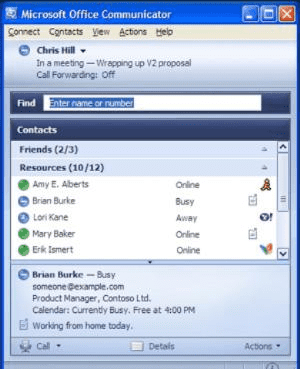
Lets say for example we want to create a Contact-list window for an IM client.

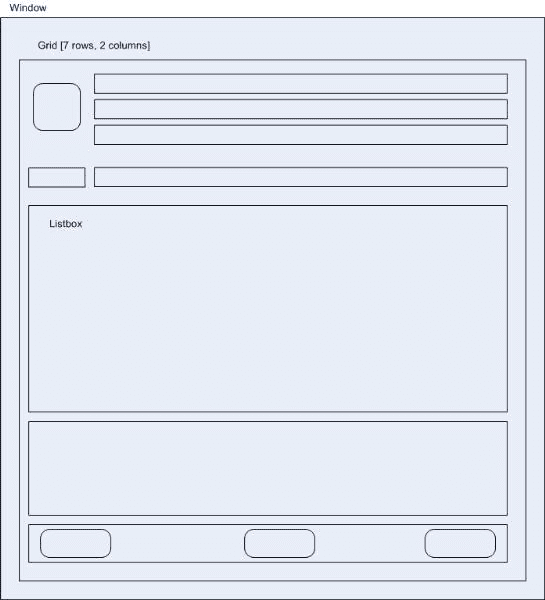
This view could be created with the following nesting of components:

In this simple structuring we have just used a Grid and laid out all the controls inside it. Since we will also be data-binding we can set up all the bindings directly in this view. This works for now but is not very amenable when your designer comes up with a better layout for the view.
The next logical step is to group related controls together inside panels. So I could put the top 3 Label controls inside a vertically-oriented StackPanel. I could then group the Icon and the StackPanel into a DockPanel and so on. Grouping these controls helps in making the view more organized. However we are still dealing with a pretty big tree of UI components. It may seem very manageable right now and you will also find it easy to set up the bindings. However if you try navigating this view after a week or more you will see that it takes some time to gear up to how things are nested.
Making the “UserControl” work for you
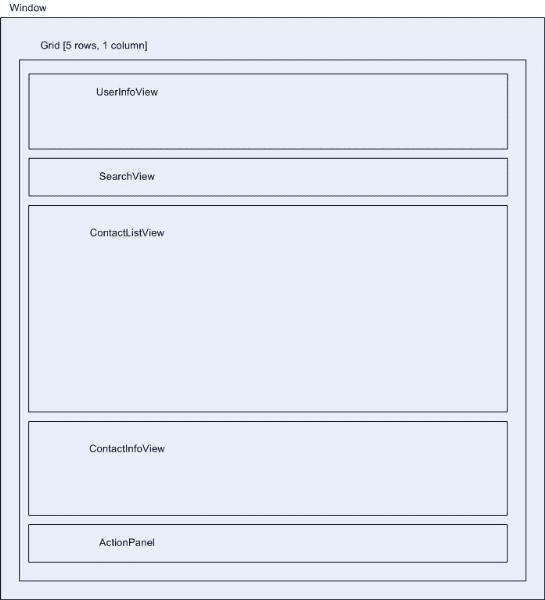
UserControls come in very handy when structuring views and work very well as organizing containers. Also since a UserControls has a DataContext property we can also set up data-bindings easily. The primary purpose of the UserControl is to contain related controls and present them as one single abstracted control. Lets look at our IM client example. If we take a step back we can imagine a more high-level organization of controls like so:

Now the Window looks more readable and we can easily identify its core UI components. Each of the views in the above figure represent a UserControl. By organizing the controls inside such UserControls we can even reuse peices like the UserInfoView, ContactInfoView in other Windows/Pages/UserControls.
Communicating between UserControls
The UserControls by themselves have no clue about the presence of other UserControls, so it is left to a top-level container to orchestrate the communication. We can create a top-level UserControl, say the DashboardView which would internally host all the other views. All the logic of communicating between views could now be contained inside DashboardView. The UserControls themselves inform to the outside world about interesting things by firing events. This is done by setting up RoutedEvents. For example in our SearchView, we could have a SearchChanged event being fired whenever the user presses the Enter key on the TextBox. This abstracts the view and delivers the required information in the form of a RoutedEvent. Here is the sample code from the SearchView UserControl:
 public partial class SearchView : UserControl
  {
    public static RoutedEvent SearchChangedEvent =
      EventManager.RegisterRoutedEvent("SearchChanged", RoutingStrategy.Bubble,
typeof(SearchChangedEventHandler), typeof(SearchView));

    public event SearchChangedEventHandler SearchChanged
    {
      add
      {
        AddHandler(SearchChangedEvent, value);
      }
      remove
      {
        RemoveHandler(SearchChangedEvent, value);
      }
    }

    public SearchView()
    {
      this.InitializeComponent();

      // Insert code required on object creation below this point.
    }

    public string SearchText
    {
      get
      {
        return _text.Text;
      }
    }

    private void Textbox_KeyDown(object sender, KeyEventArgs args)
    {
      if (args.Key == Key.Enter)
      {
        SearchChangedEventArgs evtArgs = new SearchChangedEventArgs();
        evtArgs.RoutedEvent = SearchChangedEvent;
        evtArgs.SearchText = _text.Text;
        RaiseEvent(evtArgs);
      }
    }

  }
Similarly such RoutedEvents could be set up for other views.
Setting up Databindings
Typically you would have a model object-tree for your top-level view. For setting up data-bindings, you could pass the model-object as the DataContext for the UserControl. In the above example, I could have a root model-object as IMClientModel, which has a property CurrentUser of type Person. The Person object has properties such as FirstName, LastName, Availability, Email, Address, etc. In my DashboardView I could then pass the IMClientModel.CurrentUser as DataContext to the UserInfoView.
<views:UserInfoView HorizontalAlignment="Stretch"
                       VerticalAlignment="Stretch"
                       Background="{StaticResource DarkBlueGradient}"
                       Grid.Row="0"
                       DataContext="{Binding CurrentUser}"/>
The DataContext of the DashboardView is set to the instance of IMClientModel, which is why I can simply use {Binding CurrentUser} on UserInfoView. When inside the UserInfoView, you would have Bindings to FirstName, LastName, Availability etc. Notice how the UserInfoView is self-contained and only concerned with the Person object.
Summary
The basic idea behind such view-refactoring is to make things easy for Developers and Designers. It makes the view more digestible and keeps it simple. By assembling views, instead of assembling primitive controls, we have greater flexibility in modifying the view. By adding RoutedEvents to UserControls, we can establish communication with rest of the views/outside-world. Databinding can set up using the DataContext property of the UserControl.
