Effective MobX Patterns (Part 3)
The previous two parts (Part 1, Part 2) focused on the fundamental building blocks of MobX. With those blocks in hand we can now start solving some real-world scenarios through the lens of MobX. This post is going to be a series of examples that applies the concepts we have seen so far.
Of course, this is not an exhaustive list but should give you a taste of the kind of mental-shift you have to make to apply the MobX lens. All of the examples have been created without the @decorator syntax. This allows you to try this out inside Chrome Console, Node REPL or in an IDE like WebStorm that supports scratch files.

- Part 1 - Shaping the observables
- Part 2 - Reacting to changes
- Part 3 - A Cookbook of use cases
No TLDR?
This is a long post. Sorry, no TLDR here. I have 4 examples and it should get faster and easier to read after Example 2. I think :-).
Examples
Making the shift in thinking
When you learn the theory behind some library or framework and try to apply it to your own problems, you may draw a blank initially. It happens to an average guy like me and even to the best folks out there. The writing world calls it the “Writer’s block” and in the artist’s world, it’s the “Painter’s block”.
What we need are examples from simple to complex to shape our thinking style. It is only by seeing the applications, can we start to imagine the solutions to our own problems.
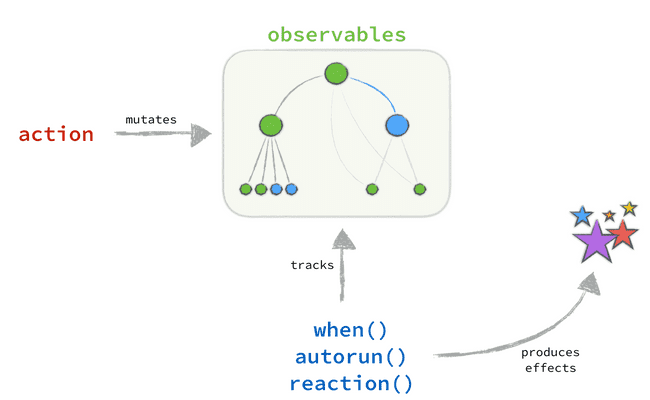
For MobX, it starts by understanding the fact that you have a reactive object-graph. Some parts of the tree may depend on other parts. As the tree mutates, the connected parts will react and update to reflect the changes.
The shift in thinking is about envisioning the system at hand as a set of reactive mutations + a set of corresponding effects.
Effects can be anything that produce output as a result of the reactive change. Let’s explore a variety of real-world examples and see how we can model and express them with MobX.
Send analytics for important actions
Problem We have certain one-time actions in the app that have to be logged to the server. We want to track when these actions are performed and send analytics.
Solution
1 The first step is to model the state. Our actions are limited and we only care when it is performed once. We can model with a map of action-name to a boolean. This is our observable state.
const actionMap = observable({
    login: false,
    logout: false,
    forgotPassword: false,
    changePassword: false,
    loginFailed: false,
});
2 Next we have to react to changes happening to these action states. Since they only happen once
during the
lifetime, we are not going to use long-running effects like autorun() or reaction(). We also don’t want these effects lying around after they execute. Well, that leaves us with only one option: …
…
…
…
…
…
Object.keys(actionMap).forEach(key => {
    when(() => actionMap[key], () => reportAnalyticsForAction(key));
});

function reportAnalyticsForAction(actionName) {
    console.log('Reporting: ', actionName);

    /* ... JSON API Request ... */
}
In the above code, we are simply looping over the keys in our actionMap and setting up a when() side-effect for each key. The side-effect will run when the tracker-function (the first argument) returns true. After running the effect-function (second argument), when() will auto-dispose. So there is no issue of multiple reports being sent out from the app!
3
We will also need a MobX action to change the observable state. Remember: never
modify your
observables directly. Always do it through an action.
For us, this looks as below:
const markActionComplete = action(name => {
    actionMap[name] = true;
});

markActionComplete('login');
markActionComplete('logout');

markActionComplete('login');

// [LOG] Reporting:  login
// [LOG] Reporting:  logout
Note that, even though I am marking the login action twice, there is no reporting happening. Perfect. That is exactly the behavior we need.
It works for two reasons:
- The
loginflag is already true, so there is no change in value - Also the
when()side-effect has been disposed so there is no tracking happening anymore.
Kick off operations as part of a workflow
Problem We have a workflow that consists of several states. Each state is mapped to certain
tasks, which
are performed when the workflow reaches that state.
Solution
1 From the description above, it seems that the only value that is observable is the state of the Workflow. The tasks that need to run for each state, can be stored as a simple map. With this we can model our workflow like so:
class Workflow {
    constructor(taskMap) {
        this.taskMap = taskMap;
        this.state = observable({
            previous: null,
            next: null,
        });

        this.transitionTo = action(name => {
            this.state.previous = this.state.next;
            this.state.next = name;
        });

        this.monitorWorkflow();
    }

    monitorWorkflow() {
        /* ... */
    }
}

// Usage
const workflow = new Workflow({
    start() {
        console.log('Running START');
    },

    process() {
        console.log('Running PROCESS');
    },

    approve() {
        console.log('Running APPROVE');
    },

    finalize(workflow) {
        console.log('Running FINALIZE');

        setTimeout(() => {
            workflow.transitionTo('end');
        }, 500);
    },

    end() {
        console.log('Running END');
    },
});
Note that we are storing an instance variable called state that tracks the current and previous state of the Workflow. We are also passing the map of state->task, stored as taskMap.
2 Now the interesting part is about monitoring the workflow. In this case, we don’t have a one-time action like the previous example. A Workflow is usually long-running, possibly for the lifetime of the application. This calls for either autorun() or reaction().
The tasks for a state are only performed when you transition into the state. So we need to wait for a change on this.state.next before we can run any side-effects (tasks). Waiting for a change indicates the use of reaction() as it will run only when the tracked observable changes value. So our monitoring code will look like so:
class Workflow {
    /* ... */

    monitorWorkflow() {
        reaction(
            () => this.state.next,
            nextState => {
                const task = this.taskMap[nextState];
                if (task) {
                    task(this);
                }
            },
        );
    }
}
The first argument to reaction() is the tracking-function, which in this case simply returns this.state.next. When the return value of the tracking-function changes, it will trigger the effect-function. The effect-function looks at the current state, looks up the task from this.taskMap and simply invokes it.
Note that we are also passing the instance of the Workflow into the task. This can be used to transition the workflow into other states.
workflow.transitionTo('start');

workflow.transitionTo('finalize');

// [LOG] Running START
// [LOG] Running FINALIZE
/* ... after 500ms ... */
// [LOG] Running END
Interestingly, this technique of storing a simple observable, like this.state.next and using a reaction() to trigger side-effects, can also be used for:
- Routing via react-router
- Navigating within a presentation app
- Switching between different views based on a mode
I’ll leave it as a reader-exercise to try this out. Feel free to leave comments if you hit any road blocks.
Perform form validation as inputs change
Problem This is a classic Web form use case where you have a bunch of inputs that need to be validated. When they are valid, you can allow submission of the form.
Solution
1 Let’s model this with a simple form-data class whose fields have to be validated.
class FormData {
    constructor() {
        extendObservable(this, {
            firstName: '',
            lastName: '',
            email: '',
            acceptTerms: false,

            errors: {},

            get valid() {
                // this becomes a computed() property
                return this.errors === null;
            },
        });

        this.setupValidation(); // We will look at this below
    }
}
The extendObservable() API is something we haven’t seen before. By applying it on our class instance (this), we get an ES5 equivalent of making an @observable class property.
class FormData {
    @observable
    firstName = '';
    /* ... */
}
2 Next we need to monitor when any of those fields change and run some validation logic. If the validation goes through we can mark the entity as valid and allow submission. The validity itself is being tracked with a computed property: valid.
Since the validation logic needs to run for the lifetime of FormData, we are going to use autorun(). We could have used reaction() as well but we want to run validation immediately instead of waiting for the first change.
class FormData {
    setupValidation() {
        autorun(() => {
            // Dereferencing observables for tracking
            const { firstName, lastName, email, acceptTerms } = this;
            const props = {
                firstName,
                lastName,
                email,
                acceptTerms,
            };

            this.runValidation(props, {
                /* ... */
            }).then(result => {
                this.errors = result;
            });
        });
    }

    runValidation(propertyMap, rules) {
        return new Promise(resolve => {
            const { firstName, lastName, email, acceptTerms } = propertyMap;

            const isValid = firstName !== '' && lastName !== '' && email !== '' && acceptTerms === true;
            resolve(
                isValid
                    ? null
                    : {
                          /* ... map of errors ... */
                      },
            );
        });
    }
}
In the above code, the autorun() will automatically trigger anytime there is a change to the tracked observables. Note that for MobX to properly track your observables, you have to use dereferencing.
runValidation() is an async call, which is why we are returning a promise. In the example above, it does not matter but in the real-world you will probably make a server call for some special validation. When the result comes back we will set the error observable, which will in turn update the valid computed property.
If you have an expensive validation logic, you can even use autorunAsync(), which has an argument to debounce the execution with some delay.
3 Alright, lets put our code into action. We will setup a simple console logger (via autorun()) and track the valid computed property.
const instance = new FormData();

// Simple console logger
autorun(() => {
    // tracking this so autorun() runs for every input change
    const validation = instance.errors;

    console.log(`Valid = ${instance.valid}`);
    if (instance.valid) {
        console.log('--- Form Submitted ---');
    }
});

// Let's change the fields
instance.firstName = 'Pavan';
instance.lastName = 'Podila';
instance.email = 'pavan@pixelingene.com';
instance.acceptTerms = true;
This is the logged output:
Valid = false
Valid = false
Valid = false
Valid = false
Valid = false
Valid = true
--- Form Submitted ---
Since autorun() runs immediately, you will see the two extra logs in the beginning, one for instance.errors and one for instance.valid, lines 1-2. The remaining four lines (3-6) are for each change in the field.
Each field change triggers runValidation(), which internally returns a new error object each time. This causes a change in reference for instance.errors and then trigges our autorun() to log the valid flag. Finally when we have set all the fields, instance.errors becomes null (again change in reference) and that logs the final “Valid = true”.
4
So in short, we are doing form validation by making the form fields observable. We also add an extra errors property and a valid computed property to keep track of the validity. autorun() saves the day by tying everything together.
Track if all registered components have loaded
Problem We have a set of registered components and we want to keep track when all of them get loaded. Every component will expose a load() method that returns a promise. If the promise resolves, we mark the component as loaded. If it rejects, we mark it as failed. When all of them finish loading, we will report if the entire set loaded or failed.
Solution
1 Let’s first look at the components we are dealing with. We are creating a set of components that randomly report their load status. Also note that some are async.
const components = [
    {
        name: 'first',
        load() {
            return new Promise((resolve, reject) => {
                Math.random() > 0.5 ? resolve(true) : reject(false);
            });
        },
    },
    {
        name: 'second',
        load() {
            return new Promise((resolve, reject) => {
                setTimeout(() => {
                    Math.random() > 0.5 ? resolve(true) : reject(false);
                }, 1000);
            });
        },
    },
    {
        name: 'third',
        load() {
            return new Promise((resolve, reject) => {
                setTimeout(() => {
                    Math.random() > 0.25 ? resolve(true) : reject(false);
                }, 500);
            });
        },
    },
];
2
The next step is to design the observable state for the Tracker. The load() of the components will not complete in a specific order. So we need an observable array to store the loaded state of each component. We will also track the reported state of each component.
When all components have reported, we can notify the final loaded state of the set of components. The below code sets up the observables.
class Tracker {
    constructor(components) {
        this.components = components;

        extendObservable(this, {
            // Create an observable array of state objects,
            // one per component
            states: components.map(({ name }) => {
                return {
                    name,
                    reported: false,
                    loaded: undefined,
                };
            }),

            // computed property that derives if all components have reported
            get reported() {
                return this.states.reduce((flag, state) => {
                    return flag && state.reported;
                }, true);
            },

            // computed property that derives the final loaded state
            // of all components
            get loaded() {
                return this.states.reduce((flag, state) => {
                    return flag && !!state.loaded;
                }, true);
            },

            // An action method to mark reported + loaded
            mark: action((name, loaded) => {
                const state = this.states.find(state => state.name === name);

                state.reported = true;
                state.loaded = loaded;
            }),
        });
    }
}
We are back to using extendObservable() for setting up our observable state. The reported and loaded computed properties track as and when the components complete their load. mark() is our action-method to mutate the observable state.
BTW, it is recommended to use computed properties wherever you need to derive values from your observables. Think of it as a value-producing observable. Computed values are also cached, resulting in better performance. On the other hand autorun and reaction do not produce values. Instead they provide the imperative layer for creating side-effects.
3 To kick off the tracking, we will create a track() method on the Tracker. This will fire off the load() of each component and wait for the returned Promise to resolve/reject. Based on that it will mark the load state of the component.
when() all the components have reported, the tracker can report the final loaded state. We use when here since we are waiting on a condition to become true (this.reported). The side-effect of reporting back needs to happen only once, a perfect fit for when().
The code below takes care of the above:
class Tracker {
    /* ... */

    track(done) {
        when(
            () => this.reported,
            () => {
                done(this.loaded);
            },
        );

        this.components.forEach(({ name, load }) => {
            load()
                .then(() => {
                    this.mark(name, true);
                })
                .catch(() => {
                    this.mark(name, false);
                });
        });
    }

    setupLogger() {
        autorun(() => {
            const loaded = this.states.map(({ name, loaded }) => {
                return `${name}: ${loaded}`;
            });

            console.log(loaded.join(', '));
        });
    }
}
setupLogger() is not really part of the solution but is used to log the reporting. It’s a good way to know if our solution works.
4 Now comes the part where we try this out:
const t = new Tracker(components);
t.setupLogger();
t.track(loaded => {
    console.log('All Components Loaded = ', loaded);
});
And the logged output shows its working as expected. As the components report, we log the current loaded state of each component. When all of them report, this.reported becomes true, and we see the “All Components Loaded” message.
first: undefined, second: undefined, third: undefined
first: true, second: undefined, third: undefined
first: true, second: undefined, third: true
All Components Loaded = false
first: true, second: false, third: true
Did the Mental Shift happen?
Hope the above set of examples gave you a taste of thinking in MobX.
Its all about side-effects on an observable data-graph.
- Design the observable state
- Setup mutating
actionmethods to change the observable state - Put in a tracking function (
when,autorun,reaction) to respond to changes on the observable state
The above formula should work even for complex scenarios where you need to track something after something changes, which can result in repeat of steps 1-3.