Effective MobX Patterns (Part 2)
In the previous part we looked at how you can setup a MobX state tree and make it observable. With that in place, the next step is to start reacting to changes. Frankly this is where the fun begins!
- Part 1 - Shaping the observables
- Part 2 - Reacting to changes
- Part 3 - A Cookbook of use cases
MobX guarantees that whenever there is a change in your reactive data-graph, the parts that are dependent on the observable properties are automatically synced up. This means you can now focus on reacting to changes and causing side-effects rather than worrying about data synchronization.
Let’s dig in and see the various ways in which you can cause side-effects.
Using @action as an entry point
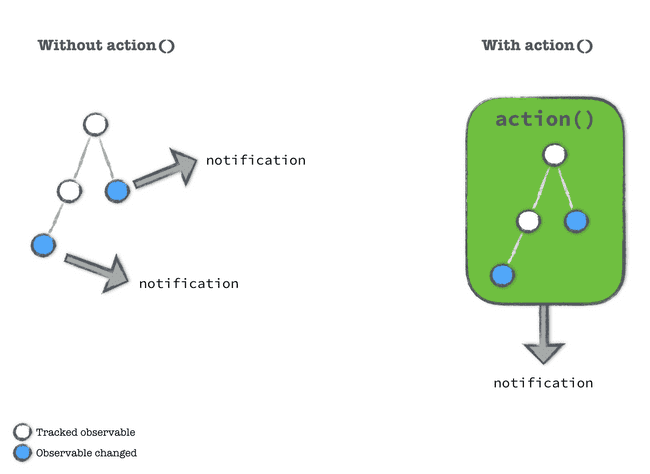
By default when you modify observables, MobX will detect and keep other depending observables in sync. This happens synchronously. However there may be times when you want to modify multiple observables in the same method. This can result in several notifications being fired and may even slow down your app.

A better way to do this is to wrap the method you are invoking in an action(). This creates a transaction boundary around your method and all affected observables will be kept in sync after your action executes. Note that this delayed notification only works for observables in the current function scope. If you have async actions which modify more observables, you will have to wrap them in runInAction().
class Person {
    @observable
    firstName;
    @observable
    lastName;

    // Because we wrapped this method in @action, fullName will change only after changeName() finishes execution
    @action
    changeName(first, last) {
        this.firstName = first;
        this.lastName = last;
    }

    @computed
    get fullName() {
        return `${this.firstName}, ${this.lastName}`;
    }
}

const p = new Person();
p.changeName('Pavan', 'Podila');
Actions are the entry points into mutating your stores. By using actions, you can make updates to multiple observables into an atomic operation.
Tip As far as possible avoid directly manipulating observables from the outside and expose @action methods that do this change for you. In fact, you can make this mandatory by setting useStrict(true).
Using autorun to trigger side-effects
MobX ensures that the graph of observables always stays consistent. But if the world were only about observables, it would be no fun. We need their counterparts: the observers to make things interesting.
In fact, the UI is a glorified observer of your MobX Stores. With mobx-react you get a binding library that makes your React Components observe the store and auto-render themselves whenever the stores change.
However, the UI is not the only observer in your system. You can add many more observers to your stores to do a variety of interesting things. A very basic observer could be a console-logger that simply logs the current value to the console when an observable changes.

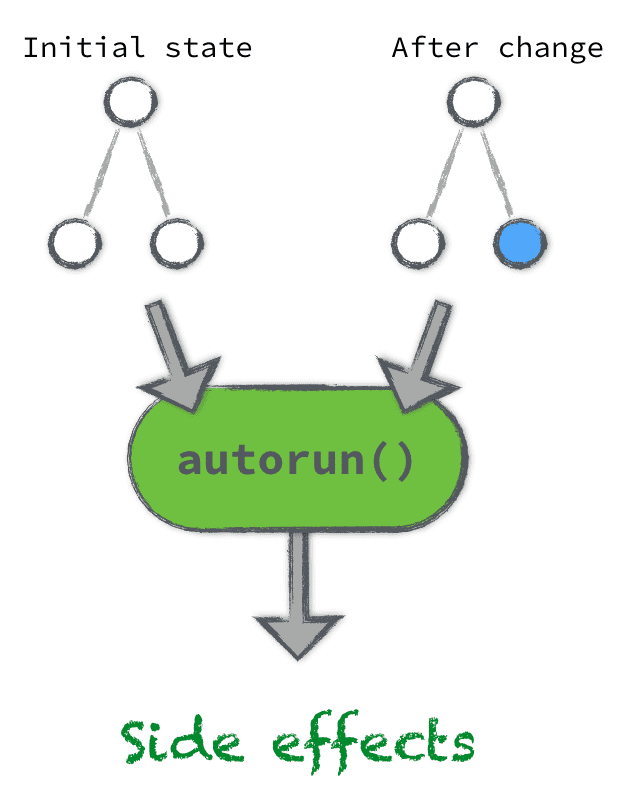
With autorun we can setup these observers very easily. The quickest way is to supply a function to autorun. Whatever observables you use inside this function are automatically tracked by MobX. Whenever they change, your function will re-execute (aka autorun)!
class Person {
    @observable
    firstName = 'None';
    @observable
    lastName = 'None';

    constructor() {
        // A simple console-logger
        autorun(() => {
            console.log(`Name changed: ${this.firstName}, ${this.lastName}`);
        });

        // This will cause an autorun() as well
        // (thanks to Adam Skinner for pointing out)
        this.firstName = 'Mob';

        // autorun() yet again
        this.lastName = 'X';
    }
}

// Will log: Name changed: None, None
// Will log: Name changed: Mob, None
// Will log: Name changed: Mob, X
As you can see in the log above, autorun will run immediately and also everytime there is a change to the tracked observables. What if you don’t want to run immediately, and instead run only when there is a change? Well, you have reaction just for that. Read on.
Using reaction to trigger side-effects after first change
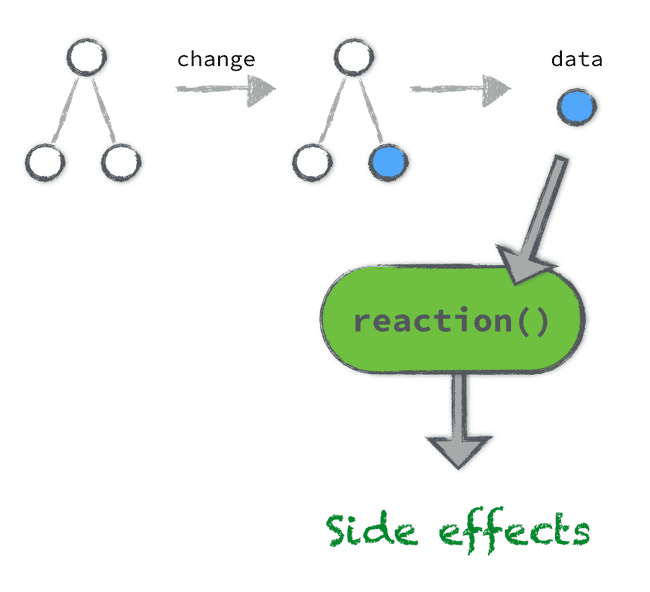
reactions provide more fine grained control compared to autorun. First, they don’t run immediately and wait for the first change to the tracked observables. Also the API is slightly different than autorun. In the simplest version you provide two inputs:
reaction(
    () => data,
    data => {
        /* side effect */
    },
);
The first function (the tracking function) is supposed to return the data that will be used to track. This data will then be passed into the second function (the effect function). The effect function is not tracked and you are free to use other observables here.

By default reaction won’t run the first time and will wait for a change from the tracking function. Only when the data returned by the tracking function changes, will the side effect be executed. By breaking the original autorun into a tracking function + effect function, you get more control around what is used for actually causing the side effect.
import { reaction } from 'mobx';

class Router {
    @observable
    page = 'main';

    setupNavigation() {
        reaction(
            () => this.page,
            page => {
                switch (page) {
                    case 'main':
                        this.navigateToUrl('/');
                        break;

                    case 'profile':
                        this.navigateToUrl('/profile');
                        break;

                    case 'admin':
                        this.navigateToUrl('/admin');
                        break;
                }
            },
        );
    }

    navigateToUrl(url) {
        /* ... */
    }
}
In the example above, I don’t want a navigation when I load the ’main’ page. A perfect case for using reaction. Only when the page property of the Router changes, will the navigation happen to the specific url.
The above is a really simple Router with a fixed set of pages. You could make this more extensible by adding a map of pages to URLs. With such an approach, routing (with URL changes) becomes a side-effect of changing some property of your store.
Using when to trigger one-time side-effects
autorun and reaction are long-running side-effects. You will create such side-effects when you initialize your application and expect them to run during the lifetime of your application.
One thing I didn’t mention before is that both these functions return a disposer function. You can call the disposer and cancel the side-effects any time.
const disposer = autorun(() => {
    /* side-effects based on tracked observables */
});

// .... At a later time
disposer(); // Cancel the autorun
Now the apps we build have a variety of use cases. You may want certain side-effects to run only when you reach a certain point in your application. Also you may want these side-effects to only run once and then never again.

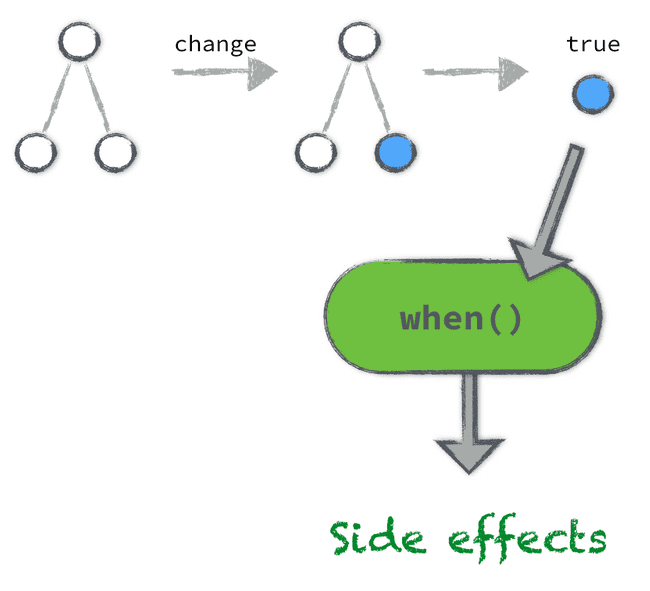
Let’s take a concrete example: Say, you want to show a message to the user when they reach a certain milestone in the app. This milestone will only happen once for any user so you don’t want to setup a long-running side-effect like autorun or reaction. It’s time you pull out the when API to do this job.
when takes two arguments, just like reaction. The first one (the tracker-function) is supposed to return a boolean value. When this becomes true, it will run the effect-function, the second argument to when. The best part is that it will auto-dispose the side-effect after it has run. So there is no need to keep track of the disposer and manually call it.
when(
    () => this.reachedMilestone,
    () => {
        this.showMessage({ title: 'Congratulations', message: 'You did it!' });
    },
);
Deliberate Ignorance
Although I have only mentioned about action, autorun, reaction and when, there are few more APIs that MobX offers for some advanced use cases. I am choosing to deliberately ignore them for now as the bulk of MobX is really about using the above mentioned APIs. Once you become comfortable with these APIs, the rest is easier to follow and grasp. This is the foundation and we have to make this second nature before we start constructing advanced and fancy structures atop.
We will have a separate post about those advanced APIs. A Part-4 perhaps :-)
A Powerful toolset
So far, we have seen a variety of techniques to track changes on an object graph and also react to those changes. MobX has raised the level of abstraction so that we can think at a higher-level without worrying about the accidental complexity of tracking and reacting to changes.
We now have a foundation on which we can build powerful systems that rely on changes to a domain-model. By treating everything outside the domain-model as a side-effect, we can provide visual feedback (UI) and perform a host of other activities like monitoring, analytics, logging, etc.
To be continued…
In Part 3, we will look at a variety of examples to apply all that we learnt so far in practice.
Huge thanks to Michel Westrate (author of MobX) for reviewing the content.
