

A SilverLight TreeMap control
Treemaps are space-filling visualizations of hierarchical data. Each node in the Treemap is represented as a rectangle, whose size depends on some attribute of the data. For example, if I am representing the high-volume trades in a day, I could have a Treemap that shows different sized rectangles based on the volume of each trade. Larger rectangles will represent the large trades and smaller rectangles, the not so large trades. The most popular of the treemap implementations use a squarified treemap algorithm that produces more squarish rectangles, resulting in better aspect ratios.
In my current SilverLight project we required a variety of features that were not present in any of the online implementations. Features like multi-level treemaps, zooming, progressive reveal of information, selection events, filtering, dynamic views, etc were something we found missing in existing implementations. We wanted a single control that had all of these features. Instead of starting from scratch we took inspiration from the following places:
A new custom control: TreeMapView
TreeMapView is the custom control I built that has many of the features mentioned earlier. Its built in SilverLight 3 and as expected does a lot of stuff via data-binding. It uses Visual State Manager (VSM) extensively for showing state changes and animating transitions. Some of the common features include:
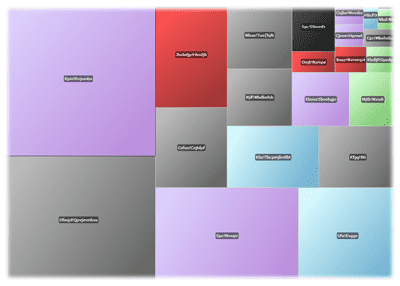
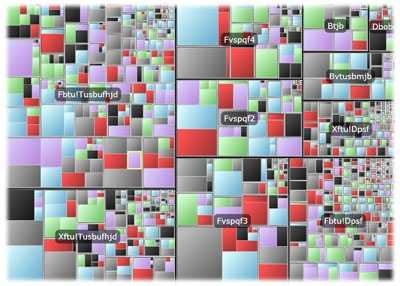
Multi-level hierarchies: It can represent multiple levels of
hierarchy, so you can visualize treemaps within treemaps! The figure
below shows three levels of treemaps.
\
Fine grained styling: One can style the root nodes, internal nodes and leaf nodes separately. It is very common to use a different style for the root level nodes, since you want them to stand out when you first see the map. Similarly, the leaf nodes require special visual treatment which is supported.
Drill downs: It is impossible to show every level legibly in one view but drill-downs make this easier. You can click and go deeper into the hierarchy and see more detail as you drill in. This is the notion of progressive reveal, which is taken care using special states. You can style the progressive reveal using VSM, giving you have complete power in choosing how and what to style and show (reveal).
Breadcrumb trail: The breadcrumb trail is useful when you are doing drill downs. The TreeMapView publishes a list of items indicating the path along a subtree. This path changes as you drill in/out. You can style this path and provide navigation support for your drill downs.
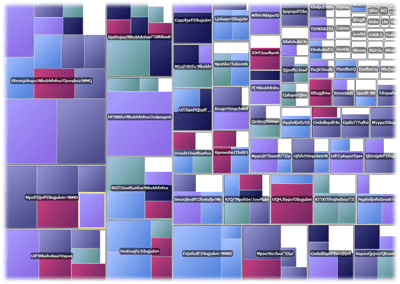
Filters: When viewing large datasets, filters make it easier to hone into the stuff you are interested. Again, the filtered state of the treemap can by stylized using VSM. The figure below shows one possible way of styling filtered items. Colored items are the ones that match the criteria.
Dynamic views: A treemap sizes the boxes based on some attribute of the data. You can change this attribute on the fly (by bindings) and see different views of the data. Quickly switching between different views gives you a better perspective of the kind of the data you are visualizing.
Coloring the tiles: This is a primary requirement of any treemap control. The color of a box indicates the weight of some attribute. You have complete control over this using bindings and converters. You can bind to the attribute you want to use for coloring the tile and use a converter to provide the different colors.
Virtualization: As you start visualizing large datasets, you cannot afford to create controls for every item. Virtualization helps in reducing the number of controls and improves the performance for this scenario. Since custom virtualization is not supported natively in SilverLight, I had to write my own version based on my experience with WPF. In principle it is similar to Deep Zoom.
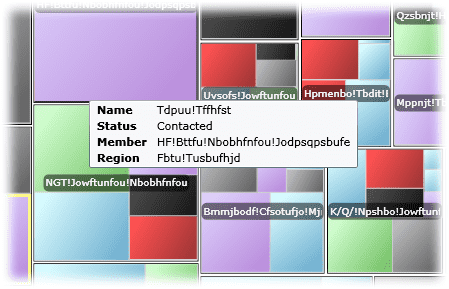
Mouse hovers: Hovers can be styled using ToolTips
Selections: You can click a tile to select it, which automatically updates the SelectedItem property and also raises the SelectionChanged event. Selections can be styled via VSM.
Usage
The programming model is fairly straightforward and using it is also simple. Here is a Xaml snippet that shows the usage:
<Controls1:TreeMapView x:Name="TM"
                       Controls:DockPanel.Dock="Left"
                       SizeBinding="{Binding Quantity}"
                       HeaderBinding="{Binding Name}"
                       ColorBinding="{Binding Status, Converter={StaticResource Converter}}"
                       ItemsSource="{Binding Traders}"
                       ChildItemsSourceBinding="{Binding ChildTraders}"
                       ItemStyle="{StaticResource DefaultItemStyle}"
                       ContainerStyle="{StaticResource DefaultItemStyle}"
                       RootContainerStyle="{StaticResource DefaultItemStyle}"
                       />
The TreeMapView creates instances of TreeMapTile for each item in a
level. TreeMapTiles can contain child tiles to give you the nested view.
The ChildItemsSourceBinding property of the TreeMapView can be used
to create nested levels. SizeBinding is used to size the tiles and
ColorBinding determines the color of each tile. Typically you would
use the ColorBinding with a converter to map the data to a brush.
ItemStyle is the style used for leaf tiles. ContainerStyle is for
internal nodes and RootContainerStyle is for the top level tiles.
Video
Here is a quick video showing all of these features in action: