

Creating and consuming XAML icons from Expression Design
I really like the simplicity and ease of use in Expression Design. Vector editing never felt so enjoyable. I play the dual role of designer and developer for my projects — not always good, but works for now. Recently I had to create some simple icons in Design and use them in a WPF app. The workflow I adopted simplified the process and made it easier for me to use. I’ll outline the steps I adopted below.
Requirements
- Create 32x32 sized XAML icons
- Icons will be high contrast: white on dark background
- Make it easier to use them directly in XAML…without any further modification
The icons that I created look something like this:


Structure of the .design file
Each icon was created on a separate layer. The layers have been named according to the icon it contains. Since each icon needs to be 32x32, I had to enclose the icon inside a rectangle (W=32, H=32) with Opacity=0 (alpha=0). This ensures that the exported XAML will constrain the icon to that size. Here is how my Layers panel looks:
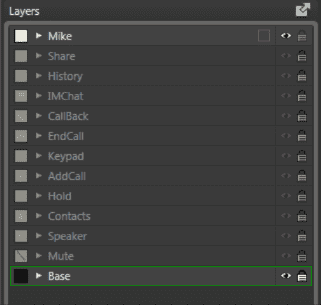
During editing, only the layer that I work on is set visible. The “Base” layer only acts as a background during the design mode. It is not exported (by setting it invisible). All the other layers will be set visible.
While exporting, use the following options:
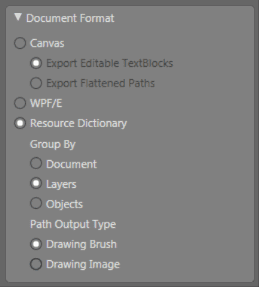
This creates a DrawingBrush for each icon and nicely names it according to the layer name! You will now have a ResourceDictionary containing all the icons as resources.
Using the icons
To use the icons, I start by including the ResourceDictionary in my component’s Resources. Then I create a <Rectangle/> of Width=32, Height=32 and set its Fill to the DrawingBrush. For example I would use the Mike icon like so:
<Rectangle Fill="{StaticResource Mike}"
            Width="32"
            Height="32"
            Grid.Row="0"
            HorizontalAlignment="Left"
            Margin="20,3,0,3"/>
If you had to create more icons, just put them on individual layers and then export them as shown above. It will dump into a ResourceDictionary which you have already included in your App. You can then use the icons as Brush resource on tags like Rectangle or Border.